Set For Life: Diamond Settings
I had the good fortune of having worked at a jewelry store that specialized in custom jewelry. While at work, the owner/best designer in metro Detroit and I would dream up design ideas for the engagement ring I knew was coming. I had numerous requests and since after the initial design, I was kept in the dark, I was overjoyed that when my husband popped the question, he did it with the most beautiful ring I’ve ever seen.
I made a lot of the choices about my engagement ring, ranging from the gold color (yellow and white two-tone) and diamond shape (oval) to the setting type. I was most specific about this: I wanted bezel set diamonds. In a bezel setting, the diamond is placed in what’s called a bezel cup, which means there is metal coming up on all sides. To set the diamond in place, the top rim of the cup is hammered down with a special tool. This forms a very small lip over the edge of the diamond, securing it.

In my opinion, bezel settings have several advantages over prong settings, which we’ll get to shortly. A bezel set diamond can be set farther into the ring, giving a much lower profile that can be achieved with some other settings. Also, since the bezel is smooth, there aren’t any prongs that can scratch babies’ faces (which is the stage of life I just exited), wood furniture, or wallpaper; or catch on fabrics and other materials.

But there is certainly something to be said for prong settings. They are a stunning way to showcase your diamond in all its glittering glory. Prongs jut up from underneath the diamond and up the sides of the diamond. Small notches are cut into the inside of the prong. The diamond girdle (the widest part of the diamond, if you were looking at a cross section of the stone) is pressed into those notches and the top of the prong is shaped over the edge of the diamond.
Prong settings generally come in four- and six-prong varieties. The four prong setting makes a square shape against the roundness of the diamond. The diamond really takes center stage here, since there isn’t much metal climbing up the sides of the diamond. However, realistically, it isn’t as secure as a six-prong setting. If you misjudge your proximity to your cabinet trim and slam your center diamond directly into it (but I would never do such a thing; I definitely don’t know this from experience), a prong could get dislodged with enough force. If you have four prongs, it is much easier to lose that diamond. If one prong gets damaged with a six-prong setting, your diamond is still secure (but you need to see a jeweler immediately to have that repaired). Depending on your lifestyle and personal tastes, you’ll need to take those factors into account.
Prong settings also have some variations. Squared prongs are v-shaped. They are most often used on princess (square) cut diamonds and marquis cuts. By cupping the whole corner, they are securing that stone well. There are also ladies’ wedding rings that use shared prongs. This is particularly helpful when the center diamond is set higher than the side stones, but the wearer wants to minimize the amount of metal between the diamonds. In shared prongs, adjacent diamonds (always at different heights), are set in notches on opposite sides of the prong.

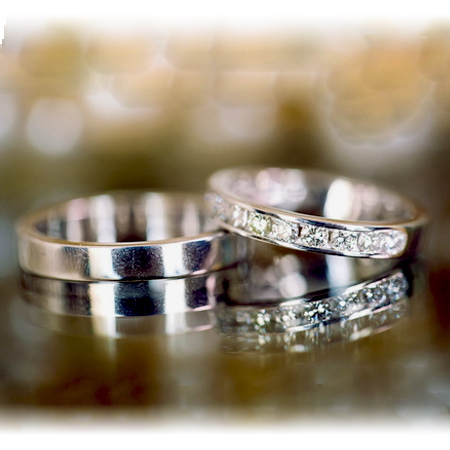
Another setting that minimizes the metal is the channel set. In a channel set, seen often in eternity rings and men’s wedding bands, diamonds are placed next to each other, between two thin bands of gold. The diamonds are pressed into notches on the inside of the bands. Then the top of the band is lightly hammered to cover a tiny part of two sides of the diamonds. A good way to understand channel set is to think of it as one long, straight bezel. There are a lot of similarities.

Pavé settings are another beautiful example of maximizing diamond real estate while keeping metal content to a minimum. Pavé uses lots of small diamonds set very close together, in an offset pattern so there is very little blank space between stones. They are held in place with very, very small spurs that are pressed down to hold several stones at once; one spur could be partially supporting three diamonds. Because of this, a fairly large surface area is needed for pave settings. This means that you won’t often find pavé diamonds on engagement or wedding rings. However, it is very popular for right-hand diamond rings and anniversary bands.
There are other diamond setting methods, like tension (the stone is literally pressed between two thick pieces of metal, with no supports underneath the stone; because of the tension on the stone, only diamonds, sapphires, or rubies can withstand this setting) or invisible (where the diamond is notched in the lower part of the stone, called the pavilion, and is pressed into a setting with metal prong-like structures that fit inside the notches; this allows diamonds to be placed flush against each other). Although beautiful and impossibly cool, tension mounts and invisible sets are not the most suitable options for everyday wear in an engagement. They require a very specific and finely tuned arrangement. One bad accident could spell disaster for the metal, which could cause a failure in stone security.
There are so many options for stone setting in jewelry. By far, the most popular is prongs, but if you are looking for something a little more unique or eye-catching, consider some other options. If you can’t find what you’re looking for, seek the wise counsel of a custom jeweler. If you live in metro Detroit, you’ll want to talk to Andre Duscio at Andre’s Fine Jewelers in Brighton, MI at 810-225-1414.
Set For Life,
Rebecca
Share This Page: